Using the Rucio JupyterLab Extension
The Rucio JupyterLab Extension brings scientific data management directly into your JupyterLab environment, allowing you to discover, access, and analyze datasets from Rucio data lakes without leaving the notebook interface.
How It Works
The extension integrates Rucio's data discovery and management capabilities into JupyterLab through a sidebar interface. When you spawn a JupyterLab session, you can choose to activate the extension and configure which experiment's Rucio cluster to connect to, as well as select a dedicated Rucio Storage Element (RSE) to be used as local storage for files.
The extension leverages the existing Rucio Storage Elements (RSEs) provided by your experiment, typically available at Tier-0 infrastructure facilities.
From the JupyterLab sidebar, you can:
- Browse Rucio datasets by scope and name
- Search for specific data using pattern matching
- Replicate data with a single click to make it available locally
- Inject file paths directly into your notebooks as variables
Authentication is flexible, supporting:
- X.509 proxy certificates
- X.509 user certificates
- Username and password
- OpenID Connect (OIDC) tokens
- Full Virtual Organization (VO) support
Authentication
Before using the extension, you need to authenticate with the Rucio cluster to access datasets.
Recommended: X.509 Proxy Certificate
If you have a grid proxy certificate, the extension can use it directly. This is the recommended authentication method.
Setup Steps:
-
Ensure your grid user certificate and key are present in the
~/.globusfolder in your SWAN/JupyterLab session -
Execute the command:
voms-proxy-init --voms <your-experiment>You can add additional arguments:
--cert: Path to your certificate if not in~/.globus--key: Path to your key if not in~/.globus--out: Specify the output path for the proxy certificate
Example:
voms-proxy-init --cert ~/.globus/usercert.pem --key ~/.globus/userkey.pem --voms atlas --out /tmp/proxy.pem -
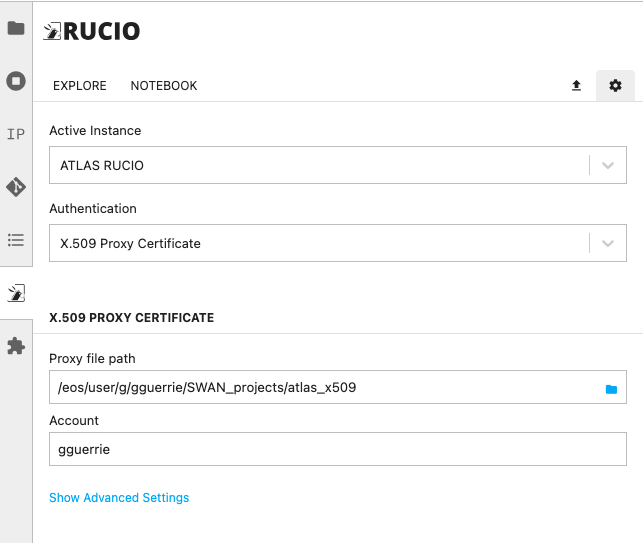
Click the ⚙️ (settings) button in the top right corner of the extension
-
Configure your credentials:
- Select X.509 Proxy Certificate from the Authentication dropdown
- Enter the path to your proxy certificate in the Proxy file path field
- Add your Rucio account in the Account field
-
Click Save Settings
-
Switch to the Explore tab and start using the extension
Disclaimer: If you're using environment-specific software stacks (e.g., setupATLAS), you might already have a way to obtain a proxy certificate. Check with your experiment's documentation.
Other Authentication Methods
The extension also supports:
- Username & Password: Direct authentication with username and password credentials
- X.509 User Certificate: Direct use of your X.509 certificate
- OpenID Connect (OIDC) Tokens: Token-based authentication (experimental)
Browsing the Rucio Catalog
Using the Search Bar
The search bar accepts items in the scope:name format:
scope: A namespace for organizing data (e.g.,atlas)name: The dataset or file name
Example searches:
atlas:mc15_13TeV- Search for datasets matching this patternatlas:*- List all elements in theatlasscopeexperiment:test.root- Find a specific file
Dynamic Scope Browsing
To browse available scopes dynamically:
- Click the folder icon to the right of the search bar
- A scope browser will appear showing available scopes
- Select a scope to pre-fill the search bar with that scope
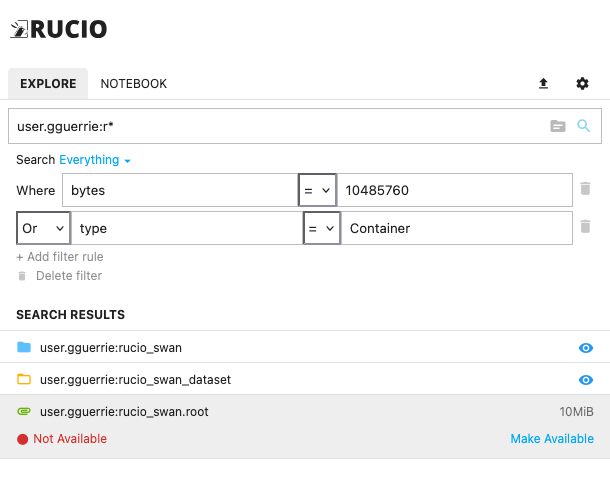
Filtering Results
Entries can be filtered by:
- Type: Container, Dataset, or File
- Metadata: Additional metadata attributes
Wildcard Search
The search method accepts the * wildcard character. For example:
example:*- List all elements registered under theexamplescopeatlas:mc*- Find all items starting withmcin theatlasscope
Troubleshooting Data Availability
If one or more files are not available on the RSE mounted in your JupyterLab session:
-
Check file replicas from the terminal:
rucio list-file-replicas <scope:name> -
This may lead to two scenarios:
Scenario 1: Files are replicated in an RSE mounted on your JupyterLab session
- Simply change your JupyterLab session configuration
- Select the RSE that already has the dataset/files replicated
- Restart your session if needed
Scenario 2: Files are NOT replicated in any RSE mounted on your JupyterLab session
- Click Make Available in the extension to trigger a replication rule
- Discuss with your experiment's conveners which RSE is best for replication
- Ensure that RSE is mounted in your JupyterLab session BEFORE triggering the replication rule
Using Data in Notebooks
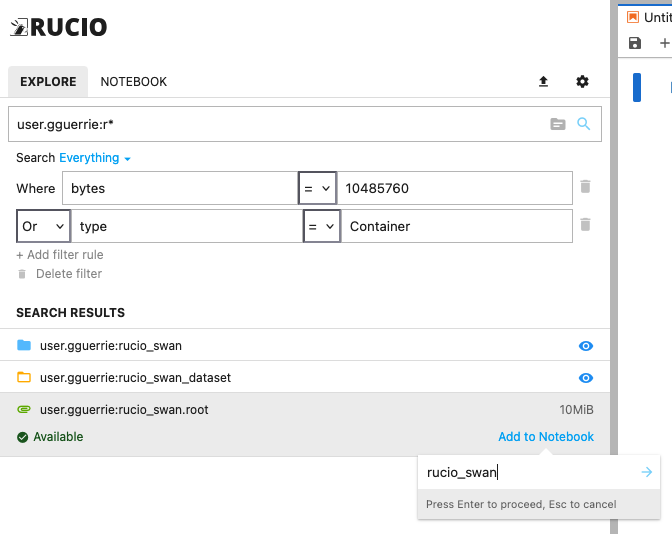
Once data becomes available on your session's RSE:
- Open a notebook in your JupyterLab session
- An Add to notebook link appears in the extension sidebar
- Click the link to add the dataset to your notebook
- Provide a variable name for the dataset (e.g.,
my_data) - Click Confirm
- A new variable containing the path to the dataset is automatically added to your notebook
The variable will contain the local file path where the data is available, allowing you to use it directly in your analysis code:
# After adding data via the extension
import numpy as np

# my_data is now a variable containing the path to your dataset
with open(my_data, 'r') as f:
    data = np.load(f)
Session Configuration
When spawning a JupyterLab session:
- You can choose to activate the Rucio extension
- A configuration form allows you to select:
- Which experiment's Rucio cluster to connect to
- Which RSE to use as local storage for your files
Terminal Usage
To use Rucio commands in your terminal within the JupyterLab environment:
- Open a Terminal window in JupyterLab
- Verify authentication status:
rucio whoami
The extension configuration is different from the terminal client configuration. To have rucio commands properly working in your terminal, follow your experiment's setup instructions (e.g., ATLAS Rucio Guide).
Advanced Settings
If you experience authentication errors:
- Click ⚙️ (settings) and then Show Advanced Settings
- Click Purge Cache to erase any saved configuration
- Try authenticating again
This can resolve issues where the extension shows:
Authentication error. Perhaps you set an invalid credential?
Further Reading
For more information on Rucio and the extension, visit: