Setting up a Rucio Developer environment using Visual Studio Code
Local Setup vs Remote Setup
It is possible to run the containers for rucio development locally or on a remote VM.
For local development machines with limited resources (<16 GB RAM, < 4 Cores), it is recommended to run the containers on a remote VM. This will allow you to use your local machine for other tasks while the containers are running on the remote VM.
Local development has been tested only on Linux hosts.
Remote development has been tested on Linux(for the remote VM) and Linux/MacOS(for the local instance of vscode).
The additional steps required for setting up a remote development environment are described in the sections begininng with Remote Only: . These sections can be ignored if you are setting up a local development environment.
Prerequisites
VSCode
Install Visual Studio Code
Remote Only: Additional Setup VSCode
For development on a remote VM, you will need to install the Remote Development Extension Pack
You should setup SSH access to your remote VM. For more information, see Connecting to a remote host
Open the Command Palette (Ctrl+Shift+P)
Run the command
Remote-SSH: Open SSH Configuration File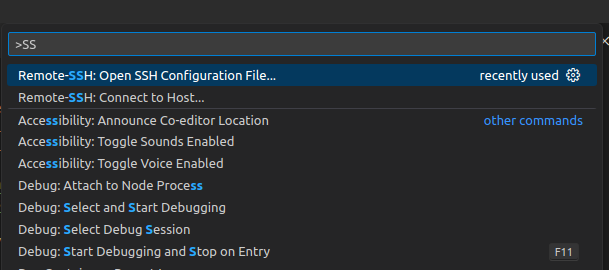
You will be asked to create a new SSH configuration file or select an existing one. If you have an existing SSH configuration file, select it. If you do not have an existing SSH configuration file, select
Create New File.Update the SSH configuration file:
Host <fqdn of your remote VM>
    HostName <hostname or ip address of your remote VM>
    User <remote user>
Additionally, you can use the
IdentityFileoption to specify the SSH key to use for authentication. For example:Host <fqdn of your remote VM>
HostName <hostname or ip address of your remote VM>
User <remote user>
IdentityFile ~/.ssh/<ssh key>If your remote VM is behind a firewall, you will need to setup a proxy. For example, at CERN, we can use lxplus as a ssh proxy to connect to the remote VMs, which are not accessible outside the CERN network. The following is an example of an SSH configuration file that uses lxplus as a proxy:
Host lxplus
    HostName lxplus.cern.ch
    User <cern_username>

Host <fqdn of your remote VM>
    HostName <hostname or ip address of your remote VM>
    User <remote user>
    ProxyCommand ssh -q -W %h:%p lxplus
For more information, see Connecting to a remote host
Test connection to Remote VM
Open the Command Palette (Ctrl+Shift+P)
Run the command
Remote-SSH: Connect to Host...Select the remote VM from the list of hosts
Depending on your SSH Configuration, you may be prompted for the password/s in the following order:
- remote user on the proxy host
- ssh key password or the password of the remote VMs user.
The bottom right corner of VS Code will show the status of the connection. If the connection is successful, you will see
SSH: <fqdn of your remote VM>in the bottom right corner:
For troubleshooting and Tips/Tricks, see Troubleshooting
NOTE for remote development: From hereon out, all the instructions should be run in the VSCode instance connected to your remote VM. ( i.e. the VSCode instance that shows SSH: <fqdn of your remote VM> in the bottom right corner)
You can use the terminal in the VSCode instance to run commands on the remote VM directly. To do so, open the terminal in VSCode instance connected to your remote VM by clicking on Terminal in the menu bar and then clicking on New Terminal.
VSCode Extensions
Install the following extensions:
VSCode comes with a plethora of extensions that can significantly improve your development experience. For more information, see Extensions
Docker and Docker Compose
- Install Docker
- Install Docker Compose
SSL Certificates
If you would like to debug the rucio webui and x509 authentication capabilities of the rucio server, you will need to obtain SSL certificates for your development environment. For remote VMs, you can request them from your IT department or you can use letsencrypt to generate a certificate. For local development machines, you can use mkcert to generate a certificate.
Whatever route you go, you should have a hostcert.pem and a hostkey.pem file accessible for your development environment.
Setting up Rucio and Configuring VSCode
Clone the rucio repository
gh repo clone rucio/rucioClone the vscode configuration repository
gh repo clone maany/rucio-vscode-dev-envMove the vscode repo inside the rucio repo
mv rucio-vscode-dev-env rucio/.vscodeCopy the SSL certificates to the
rucio/.vscode/certsdirectoryOpen VSCode. If you are using a remote VM, open the VSCode instance connected to your remote VM.
Go to
File->Open Folderand select theruciofolderEdit the rucio/.vscode/docker-compose.yml and change the
RUCIO_HOSTenvironment variable for the rucio-dev container tohttp://localhostif you are using a local development environment or to the fqdn and port of your remote VM if you are using a remote development environment.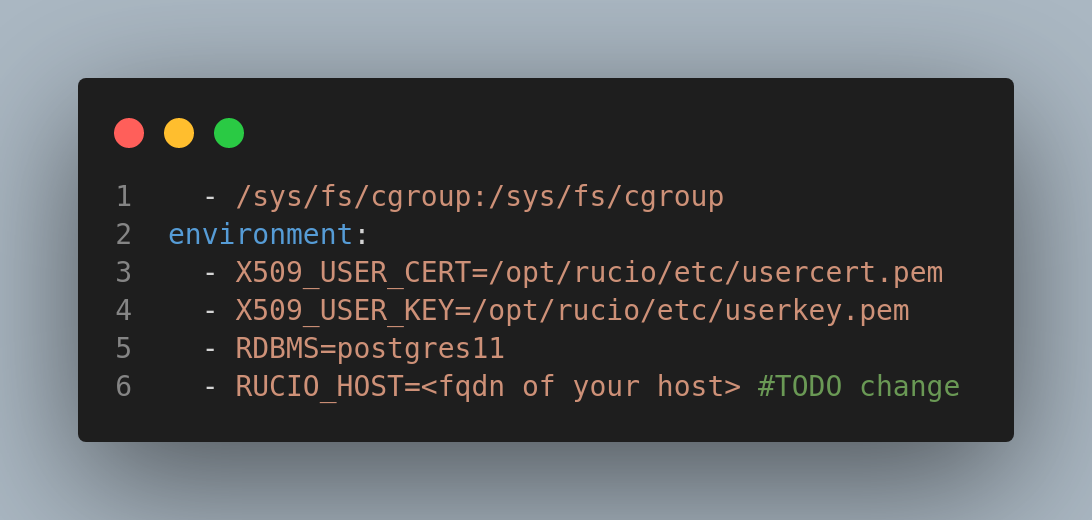
Add the default url for webui in
rucio.cfg.template, which is required to handle Cross Origin Requests (CORS) in the webui. Add the following line to the[webui]section ofrucio.cfg.template:urls = <http://url-of-webui:port>If your server is running on a remote VM, but webui will be running locally, then the requests originating from webui to the server will have the origin
http://localhost:3000.If both the server and webui are running locally, then the requests originating from webui to the server will have the origin
http://localhost:3000. In this case, you can set theurlstohttp://localhost:3000.If both the server and webui are running on the same remote VM, then the requests originating from webui to the server will have the origin
http://<fqdn-of-remote-vm>:3000. In this case, you can set theurlstohttp://<fqdn-of-remote-vm>:3000.
VSCode Tasks
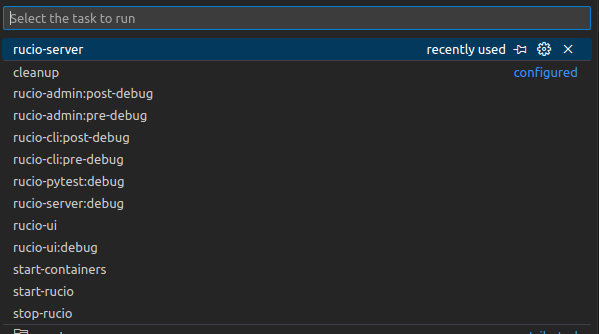
- Open the Command Palette (Ctrl+Shift+P)
- Run the command
Tasks: Run Task - You should see a list of pre-configured tasks
These tasks are helpful utilities for your to quickly start/stop rucio containers and to setup different types of debuggers ( server, webui, pytest, clients, ...).
Starting Rucio
- Open the Command Palette (Ctrl+Shift+P)
- Run the command
Tasks: Run Task - Select
start-rucio - This will start and initialize the rucio development environment. The first time you run this task, it will take a while to fetch and build the docker images. Subsequent runs will be much faster.
- After the command has finished, you can run
docker ps -ato check if all the containers are up and running. You should see something like this: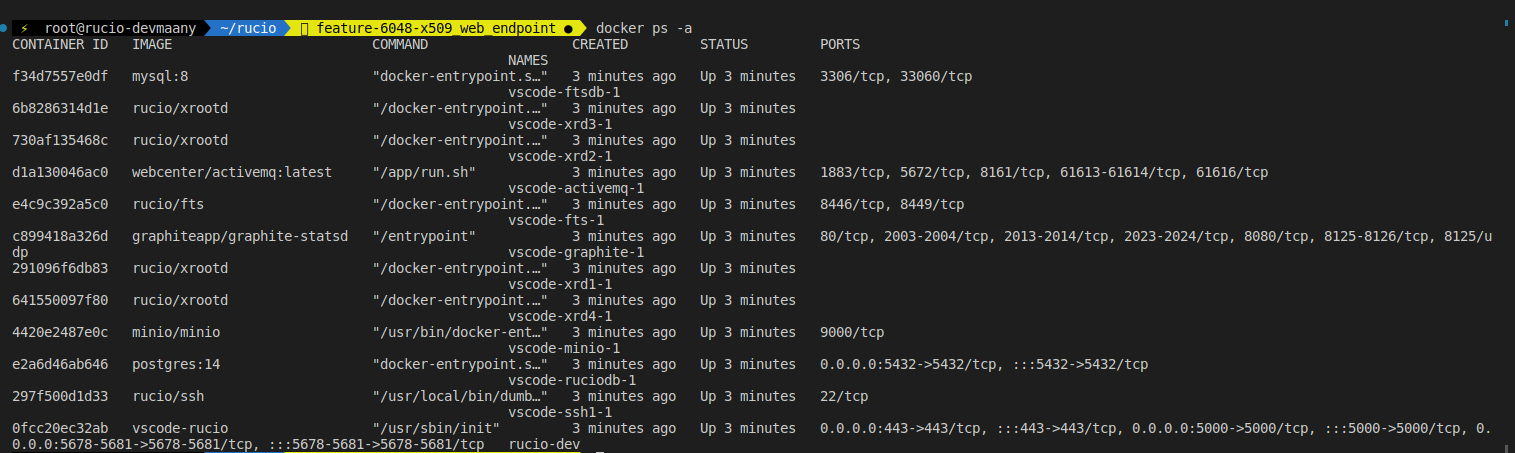
Stopping Rucio
To take down all the containers, run the stop-rucio task. This is equivalent to a docker-compose down command.
Debugging Overview
After you have run the start-rucio task, you can start debugging the rucio server, webui, clients, etc.
The debugging process for Rucio in VSCode is broken down into 3 steps:
- Start the process inside the
rucio-devcontainer that you want to debug - Attach the debugger to the process
- Insert breakpoints in the code and start debugging
After you are done debugging, you should remember to
- detach the debugger from the process
- run the
cleanuptask to remove all processes inside the container that were used for debugging.
Debugging Rucio Server
After you have run the start-rucio task, you can start debugging the rucio server.
Open the Command Palette (Ctrl+Shift+P)
Run the command
Tasks: Run TaskSelect
rucio-server:debugAttach the debugger to the rucio server by clicking on the
Debugicon in the left sidebar and selectingServer: Debugfrom the dropdown menu.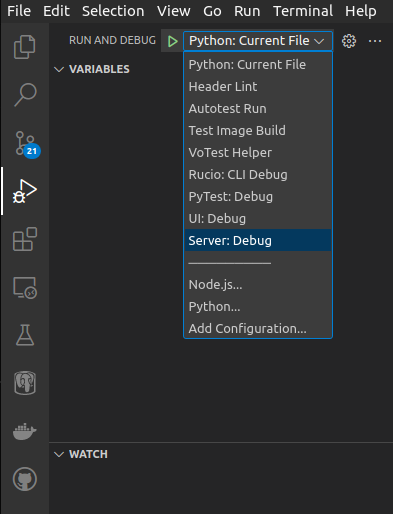
Press
F5to start debugging the rucio server.You can now set breakpoints in the rucio server code and debug the server.
After you have finished debugging, you can detach the debugger from the rucio server by clicking on the Stop button in the debug toolbar.
NOTE: After detaching the debugger, run the cleanup task to remove all processes inside the container that were used for debugging.
Debugging Rucio WebUI
After you have run the start-rucio task, you can start debugging the rucio webui.
To debug the rucio webui, you will need to start the rucio server in non-debug mode and the rucio webui in debug mode.
- Open the Command Palette (Ctrl+Shift+P)
- Run the command
Tasks: Run Task - Select
rucio-serverto start a rucio-server in non-debug mode - Open the Command Palette (Ctrl+Shift+P)
- Run the command
Tasks: Run Task - Select
rucio-ui:debug - Attach the debugger to the rucio webui by clicking on the
Debugicon in the left sidebar and selectingUI: Debugfrom the dropdown menu. - Press
F5to start debugging the rucio webui.
Debugging Rucio CLI Clients ( rucio-admin and rucio)
Debug rucio cli client
After you have run the start-rucio task, you can start debugging the rucio cli clients.
To debug the rucio cli clients, you will need to start the rucio server in non-debug mode
- Open the Command Palette (Ctrl+Shift+P)
- Run the command
Tasks: Run Task - Select
rucio-serverto start a rucio-server in non-debug mode
Then, you need to start the rucio-cli:pre-debug task to inject the debug configuration into the rucio cli clients.
Open the Command Palette (Ctrl+Shift+P)
Run the command
Tasks: Run TaskSelect
rucio-cli:pre-debugStart the
Rucio:CLI Debuglaunch configuration by clicking on theDebugicon in the left sidebar and selectingRucio:CLI Debugfrom the dropdown menu.Press
F5to start debugging the rucio cli clients.After that, you should open a shell inside the
rucio-devcontainerdocker exec -it rucio-dev bashInsert breakpoints in the rucio cli clients code.
Run a rucio cli command to trigger the breakpoint.
After you are finished debugging, you should remember to
- detach the debugger from the debug process
- run the
rucio-cli:post-debugtask to remove the debug configuration from the rucio cli clients. - run the
cleanuptask to remove all processes inside the container that were used for debugging.
Debug rucio-admin client
The instructions are the same as for the rucio client, except that you need to start the rucio-admin:pre-debug task to inject the debug configuration into the rucio-admin client.
After debugging, you should run the rucio-admin:post-debug task to remove the debug configuration from the rucio-admin client.
Debugging Rucio Tests
After you have run the start-rucio task, you can start debugging the rucio tests.
To debug the rucio tests, you will need to start the rucio server in non-debug mode
- Open the Command Palette (Ctrl+Shift+P)
- Run the command
Tasks: Run Task - Select
rucio-serverto start a rucio-server in non-debug mode
Then, you should open the file containing the test you want to debug in VSCode.
Insert breakpoints in the test code.
Start the
rucio-pytest:debugto start the test in debug modeAttach the debugger to the test by clicking on the
Debugicon in the left sidebar and selectingPytest: Debugfrom the dropdown menu.Press
F5to start debugging the rucio tests.
After you are finished debugging, you should remember to
- detach the debugger from the debug process
- run the
cleanuptask to remove all processes inside the container that were used for debugging.